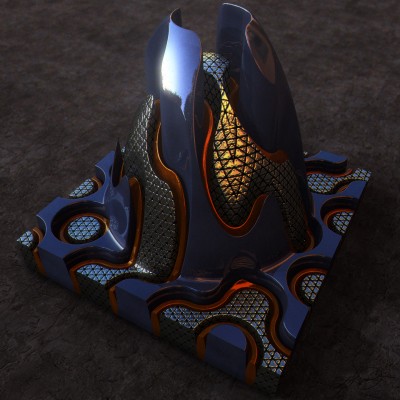
“Terrain Cone”
This was a another departure, one that I like to take quite often and that is to go about creating something in a way that is not the norm. In this case, I did not model this abstract piece with polygons but rather it is a image turned into a 3D mesh. There are many names for this depending on what program you are using. Nowadays, most 3D programs would call this a Displacement map.
LONG ago they were called G2H (grayscale to height) and if you are using a landscape generation program (Bryce, Terragen, Vue) you might import one called a DEM (Digital Elevation Map) and the resulting mesh in said programs would probably just be referred to as a “Terrain”.
The difference between a what a Displacement Map does and a “Terrain” is that a Displacement Map will displace (morph) an existing 3D mesh’s surface in any direction, while G2H/DEM is creating a 3D mesh based upon the image and with an image you only get creation on the Y axis, meaning up and down (height, elevation, etc) So, it’s limiting but still can be fun as in, anything I draw in Photoshop can be turned into a 3D mesh. Sure with limitations, but it leads to some bizarre/fun experimentation’s.
To be simple, a G2H/DEM Map is a grayscale (black and white) image. Any image can be used but ones with a greater amount of levels of gray are desired because this will give a better, smoother, more complex resulting mesh. I’m not going to get into it here (as it is a loooong explanation) but the best images for doing this are what are referred to as 16-bit grayscale and they can come in a handful of image format extensions, but one of the most common is .tif. The 16-bit part means they can have up to 65,535 levels of gray versus a .jpg which can only carry a maximum of 255 levels.
When turning an image into a mesh, its simple; lighter parts of an image result in higher areas of the resulting mesh, darker parts of the image produce lower areas.
So, back to the render and in very short order; I used a 2D program called Filter Forge and I tweaked a preset called “Truchet Tiling“. I rendered out the preset with Filter Forge set to render just the Bump Map at 2K. This gave me a grayscale looking image (it’s actually color). I took the image into Photoshop and manipulated it so I would have the various sections separated out so each section then could be turned into seperate 3D meshes, so I could apply different materials (textures, shaders, etc) to each one. Also in Photoshop, I had added a bright circle gradient on top of each seperate section as to produce the rising cone area in the 3D mesh.
I turned the images into meshes, applied various procedural shaders and rendered.
In a small, convoluted nutshell, that’s it, lol.

Leave a Reply